
Looking for ways on how to select all photos on iPhone? Read no further! Read this guide to learn how to Select All in Photos on iPhone in 3 simple ways.
Posted by Trump on April 17, 2025
5 min read
How do I select all photos in the Photos app? I can’t find a Select All button, but maybe there’s another way to do it. Thank you!” - A Question from Reddit
iPhone’s Photos app always stores your precious memories and moments, which take up a large storage space. In some cases, you need to select all of them to delete, share, or back up. Is there a Select All option on iPhone? It depends. If it is in the Album, there is a Select All feature; if it is in the Photos Library, the answer is no.
No matter whether iPhone offers the Select All feature or not, we will illustrate 3 useful and easy methods in the following section. Keep reading to learn the details.
Although this method may be frustrating and boring, it helps. Especially when you delete photos, you need to select and check each one to remove it, so you can ensure you are deleting the right one. Here is how:
Step 1: Launch the Photos app on your iPhone.
Step 2: Go to the Library, tap the Select button on the top right corner, and then select the photo.
Step 3: If you select it successfully, there will be a blue tick in the lower right corner of each image. Then, you can repeat the same step until you select all the photos you need.

What is the fastest way to select a lot of photos on an iPhone? Although there is no Select All feature on the Library page, it does offer a touch-and-drag gesture. So, by using your two fingers flexibly, many photos can be selected at one time. Let’s dive into the detailed steps:
Step 1: Go to the Photos Library and hit the Select button in the top right corner.
Step 2: Tap the photo you want to select, touch your finger to the screen, and slide your finger over the images. At the same time, use your other finger to tap near the top of the screen, which selects all photos and jumps to the top quickly.

Also, you can select photos simply by swiping your finger over the images vertically and horizontally. This method is much more useful if you are wondering how to select all photos on your iPhone and delete them.
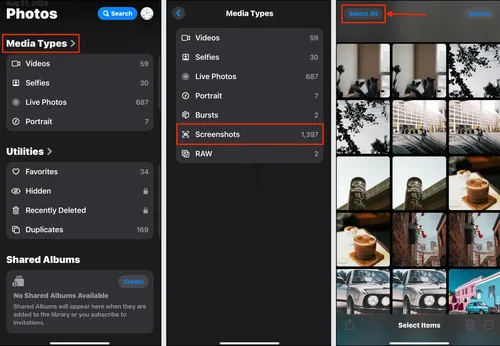
As mentioned earlier, the Select All feature is available under Albums. So, if you want to organize your album and wonder how to select all photos on iPhone without scrolling, check the steps below:
Step 1: Launch the Photos app and navigate to Albums.
Step 2: We take Screenshots as an example. After tapping Select in the upper right corner, a Select All button will be on the left upper side. This is how to select all on iPhone Photos.
Note: How to select all photos on a Mac? It’s much easier! You can open the Photos app on your Mac and press Command + A to select all photos effortlessly.
The reason Apple doesn’t offer a Select All feature in Photos Library is to prevent accidental deletions. But don’t worry if you delete photos and videos unintentionally, since there are many solutions to get them back. But here is the thing you should pay attention to. iCloud always just keeps the latest version of your data, which means if you delete photos before the last backup, it will be difficult to restore the deleted items from iCloud/iCloud Backup.
Thankfully, we still have walkarounds! Gbyte Recovery offers a direct and effortless way to restore iPhone data, even if you have deleted the data or you have changed to a different iPhone model. It is designed to help you restore all kinds of data, such as Messages, Calls, Contacts, Safari-History, Safari, Photos & Videos, FaceTime, Instagram, Kik, Line, etc.

With the help of this data recovery service, you don’t need to worry about data loss anymore. It offers the following benefits and advantages:
Key Features
Now, check out the detailed steps below to learn how to restore photos via this tool after selecting all photos on your iPhone to delete:
Step 1: Install Gbyte Recovery from its official website for free.
Step 2: After setup is successful, launch the app, select Photos, and hit Scan to continue.
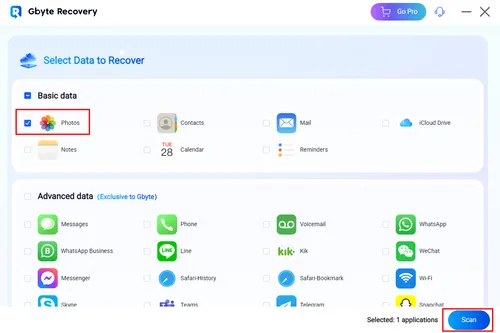
Step 3: You will be asked to sign in with your Apple ID. After logging in successfully, Gbyte Recovery will scan and load all photos, including deleted photos, on the main page.
Note: Depending on how many photos and videos you have, the scan process can be different. If you have a lot of data, you need to be patient during this process.
Step 4: When photos are shown on the main page, you can now select the ones you want to restore. Simply hit the Recover to PC button, and all selected items will be restored in that folder on your desktop so you can check it later.
After reading this comprehensive article, you now know how to select all photos on an iPhone. In a nutshell, you can select one by one if you don’t mind repeating operations. Or, you can use the tough-and-drag gesture. At the same time, you can simply Select All under an album on your Photos app.
Additionally, if you delete photos accidentally and find it hard to restore from iCloud, don’t worry. You can take advantage of a reliable and smart data recovery service called Gbyte Recovery. This tool helps you restore all types of data without any effort. Even if you changed different iPhone models, you can get data back as long as you are always using the same Apple ID.
Lost data? Get it back fast.
Recover lost messages, photos, videos, etc. from your iPhone in minutes — simple, fast, and reliable.

100% Secure
660,000 people have downloaded it.